Added: 8 August, 2007
Group: Photoshop
Create Web 2.0 Button
Author: Larry
page: 1
Create web 2.0 button
Its popular. Its stylish. Easy to create in Photoshop and every serious web site should have a nicely fitted button. You can use it for specifying categories on your site or just processing forms. It has multiple usage.

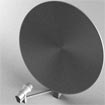
We are going to be creating those web 2.0 buttons that have been all the rave somewhat recently.
Step 1. New document

Step 2. Use the rounded rectangle tool to create a button (black as a foreground is just fine).


Step 3. Right-click anywhere with the rounded rectangle tool still selected. Select Make Selection and then click OK in the opening windows/dialog box.
Now it is time to choose a color. What did you say? Yellow/Orange? Why sure, alrighty. For a yellow/orange theme select a slightly light yellow and a light orange.


Step 4. Dish out your gradient tool of course with the following settings


Now, press Ctrl+D to deselect then create a new layer. Ctrl+Click on the old layer then Select > Modify > Contract, 2 px.

Press D then X to get white as your foreground color. Make sure the gradient has the following settings then create a gradient from top to somewhere three quarters of the way down.


Press Ctrl+D to deselect then make a marquee selection like such:

Press Ctrl+Shift+I to invert the selection, then press Del (to delete).
Step 5. Take this moment to rename your layers

Step 6. Create a new layer, rename it to text, then type in some text.

Step 7. Now you can use the techniques learned in the tutorial Web 2.0 Text in order to completely finish your web 2.0 button.

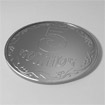
Final.
GO to: Page 1 : Create web 2.0 button
TechTut.com This tutorial is copyrighted. Partial duplication or full duplication is prohibited and illegal. Translation or usage of any kind without author�s permission is illegal.


 Join our RSS feed
Use our RSS feed to get the latest published tutorials directly to your news reader.