Added: 11 November, 2007
Group: Photoshop
Create realistic iPod in Photoshop
Author: Photoshoper
page: 2
Create iPod using Photoshop part 2
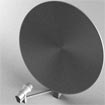
5. Select the Elliptical Marquee Tool(M), 5,1.hold shift and make a circle,and place it in the middle of the base of the iPod, then right click on it and Layer via Copy, and set the Blending Options like this:


6. Now make the center button again with the Elliptical Marquee Tool(M) and do the same as with the control circle, but change the settings/experiment with it till you are satisfied with the result

7. As you see on this picture I have changed the styles of these two circles, because there are different models of iPods, and this style looks best to me:)

8.Now with the Horizontal Type Tool(T) type the MENU word with Arial font, and use Webdings font for the Rewind sign(9)-for the Forward sign right click on the rewind layer and Duplicate Layer, then go to Edit> Transform> Flip Horizontal, and for the Play sign type 4 and for the Pause;

GO to: Page 1 : Create iPod using Photoshop part 1
GO to: Page 2 : Create iPod using Photoshop part 2
GO to: Page 3 : Create iPod using Photoshop part 3
GO to: Page 4 : Create iPod using Photoshop part 4
TechTut.com This tutorial is copyrighted. Partial duplication or full duplication is prohibited and illegal. Translation or usage of any kind without author�s permission is illegal.


 Join our RSS feed
Use our RSS feed to get the latest published tutorials directly to your news reader.