Added: 8 January, 2008
Group: Cinema 4D
How to create a cream tube in Cinema 4D
Author: TechTut.com
page: 3
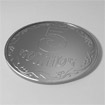
Final render of a cream tube
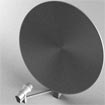
22. Create object camera:

23. Adjust position of camera and point of attachment of camera:

24. Now add 3 light sources. 1 - from above tube, blue. 2 - near camera, orange. 3 - side, white.

25. Apply Floor object:

26.Start making textures, in the lower left corner press File> New Material:

27. Change material, for material application simply drag it on the object:

28. To adjust render, press Edit Render Setting:

29. We will not go deep into adjustments, simply enable function Global Illumination, Surface Caustics and Surface Volume, to make final render press Render in Picture Viewer:

30. Here final result:

GO to: Page 1 : Cream tube model Cinema 4D part 1
GO to: Page 2 : Cream tube model Cinema 4D part 2
GO to: Page 3 : Final render of a cream tube
TechTut.com This tutorial is copyrighted. Partial duplication or full duplication is prohibited and illegal. Translation or usage of any kind without author�s permission is illegal.


 Join our RSS feed
Use our RSS feed to get the latest published tutorials directly to your news reader.